This is a nice quick meal. We were eating it within 20 minutes of walking in the door. And for two people who aren't particularly fond of broccoli, we found this delicious and very moreish.
Purple sprouting broccoli and feta tart
(For two)
1 tbsp olive oil, plus a little for greasing
1 shallot, finely chopped
1 clove garlic, finely chopped
1/2 a habanero or 1 birds eye chilli, finely chopped
1 small leek (white part only), sliced
1 green garlic top (white part only), sliced
a large handful purple sprouting broccoli, head pulled off stalks (roughly 100g or 1.5 cups broccoli heads)
1/2 a tomato, roughly chopped (optional, but add whatever leftover veg you have)
1 small glug (about 3 tbsp) white wine, or water
1 large flour tortilla, or whatever else you have on hand to line a flan tin (shortcrust or puff pastry, a pastry shell, etc)
30 g Applewood smoked cheddar (optional, or just use all feta)
70 g feta cheese
4 small or 3 medium eggs
salt and pepper to taste
Spanish smoked paprika
Preheat the oven to 180C. Heat the oil over medium heat in a frypan and add the shallots, garlic and chilli, saute for a minute or two until soft. Add the rest of the vegetables and cook for another minute or two, then add the wine or water, cover and cook for two minutes until the veg are lightly steamed and the wine has cooked off. Season with a little salt and remove from the heat.
Lightly grease a flan tin with olive oil and line with the tortilla, or whatever pastry you have on hand. Turn the veggie mixture into the tortilla shell and spread around. Crumble the cheese over the veg. Beat the eggs with a little salt and pepper and pour over the filling. Sprinkle a healthy pinch of smoked paprika over and bake in the oven for 10-12 minutes, until the eggs are golden and cooked.
As it was a nice summer's evening we ate this as a light supper in the garden, with a mixed salad of leaf greens tossed with a little olive oil and balsamic vinegar. With a glass of that lovely white wine, as we'd opened the bottle!
Friday, 21 May 2010
Thursday, 20 May 2010
Why do people grow their own food?
Mr G and I have been discussing quite a lot lately, why people grow their own food. After all, there are two perfectly good supermarkets just over 5 miles away from our house. I'm sure that many of our neighbours (who do grow their own veg, and even early potatoes) think we're odd for wanting to grow our own maincrop potatoes for storage when we could buy a 25-kilogram sack of local spuds for £3-£6.
But there are so many reasons why one would want to. I like that I can eat the skins of my potatoes and know that I'm eating vitamins and nutrients, not pesticides. And we love the fact that, aside from the cost of transport of the seed potatoes to our house, our potatoes have effectively been grown entirely without oil input. They're fertilised with compost and horse manure from the horses in the field beside the allotment, and they're harvested and taken home by bicycle.
And that's the answer we've come to. I've been moving towards self-sufficiency, with varying levels of rapidity and sucess, for well over a decade, because it's in my makeup. It started from being a chef and wanting to know the provenance of my food, to growing my own food to ensure I had the best and freshest ingredients, to learning more about permaculture, having an efficient food system and wanting to take responsibility for my own consumption. It became compulsive: I feel a need to provide for my family. And there you have it: once you start, it's very compulsive to be able to provide.
I've always been amazed that as a culture, we've put the entire security of one of our most essential needs for life into the hands of the multinational companies. In direct opposition to the "just in time" method of food providing that most people rely on now (using the supermarket as their food store), this way of thinking about your food supply is part of the "siege mentality". Not only do I know where my food has come from, being reliant on yourself for your food supply means that you will never go hungry. I've always struggled to understand panic buyers, who strip a supermarket of bread at the first sign of a snowfall. When I run out of bread, I pull the (locally grown, stone-ground in a local watermill) flour out of the pantry and bake more.
And it's really rewarding to enjoy a huge potato tortilla for brunch, knowing that all of the ingredients have been produced by your efforts.
So what does this have to do with all the posts I've been making lately about the progress of the garden and eating our own food? Everything. Mostly though, this is so compulsive that I chose to take two days off work at the start of this week, to catch up on all the spring tasks that I felt were getting away from me. Which mostly involved finishing all of the digging in the allotment. Although it might seem late in the year to still be digging and building garden beds, it's been a long, cold spring here, with the weather only just starting to warm up enough for decent spring/early summer planting.

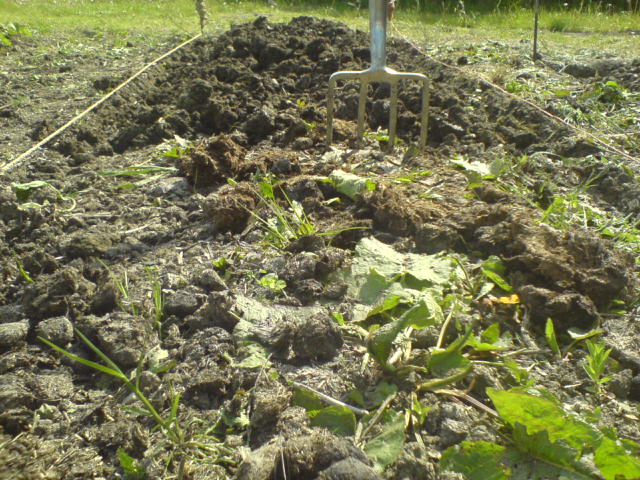
I enjoy digging, I find it quite peaceful, but I don't subscribe to digging a garden on the whole. I have always been a no-dig gardenener, preferring to let the worms do the digging for me, and this garden bed has proven the effectiveness of that. In this case I'm making an exception, so that I can form the beds and loosen the hard clay soil of the allotment to give the roots of my veg a chance to penetrate. This bed is to be the tomato, courgette and squash bed; all the hungry feeders. I dumped barrow load after barrow load of well-rotted horse manure on this bed back in January and let time, worms and weather do their thing. You can see in the photo above that although heavy weeds such as dock had set in, the manure had done a good job of rotting down. The quality of the soil was really obvious in this bed, compared to untreated parts of the garden, which in this dry weather are concrete-like hard-pan clay.

This photo shows clearly just how many worm holes there were in the soil. Every one of those gaps is a worm hole. It was full of worms, especially compared to other parts of the garden. And they were huge:

This all makes me very happy. I feel I won't need to dig after this year, except for planting and collecting potatoes. Mulching will do the rest for fertility for me.
After a couple of half days, I had the allotment looking less like a patch of bare dirt and more like this:
 All the digging done!
This is the allotment in its final form now. The closest three beds, in the right of the photo, are the potato patch. The next to the right are the combined carrot, onion and radish bed in the front, and vast quantities of garlic behind. The next, with the cloche frames over, will be the cooking greens (pak choi, stir fry greens etc) bed. The cloche frame is to protect the greens from the deer. Behind that will be the courgettes, melons and squashes. I hope to plant those out this coming weekend, now that it seems the frost risk has passed. The next bed on from there will be the bean beds, and soon there will be teepees running all the way down them.
Next time, I'll post more of an update on how the veg themselves are doing. But for now, I think it was a really worthwhile use of two days of leave time.
But there are so many reasons why one would want to. I like that I can eat the skins of my potatoes and know that I'm eating vitamins and nutrients, not pesticides. And we love the fact that, aside from the cost of transport of the seed potatoes to our house, our potatoes have effectively been grown entirely without oil input. They're fertilised with compost and horse manure from the horses in the field beside the allotment, and they're harvested and taken home by bicycle.
And that's the answer we've come to. I've been moving towards self-sufficiency, with varying levels of rapidity and sucess, for well over a decade, because it's in my makeup. It started from being a chef and wanting to know the provenance of my food, to growing my own food to ensure I had the best and freshest ingredients, to learning more about permaculture, having an efficient food system and wanting to take responsibility for my own consumption. It became compulsive: I feel a need to provide for my family. And there you have it: once you start, it's very compulsive to be able to provide.
I've always been amazed that as a culture, we've put the entire security of one of our most essential needs for life into the hands of the multinational companies. In direct opposition to the "just in time" method of food providing that most people rely on now (using the supermarket as their food store), this way of thinking about your food supply is part of the "siege mentality". Not only do I know where my food has come from, being reliant on yourself for your food supply means that you will never go hungry. I've always struggled to understand panic buyers, who strip a supermarket of bread at the first sign of a snowfall. When I run out of bread, I pull the (locally grown, stone-ground in a local watermill) flour out of the pantry and bake more.
And it's really rewarding to enjoy a huge potato tortilla for brunch, knowing that all of the ingredients have been produced by your efforts.
So what does this have to do with all the posts I've been making lately about the progress of the garden and eating our own food? Everything. Mostly though, this is so compulsive that I chose to take two days off work at the start of this week, to catch up on all the spring tasks that I felt were getting away from me. Which mostly involved finishing all of the digging in the allotment. Although it might seem late in the year to still be digging and building garden beds, it's been a long, cold spring here, with the weather only just starting to warm up enough for decent spring/early summer planting.
I enjoy digging, I find it quite peaceful, but I don't subscribe to digging a garden on the whole. I have always been a no-dig gardenener, preferring to let the worms do the digging for me, and this garden bed has proven the effectiveness of that. In this case I'm making an exception, so that I can form the beds and loosen the hard clay soil of the allotment to give the roots of my veg a chance to penetrate. This bed is to be the tomato, courgette and squash bed; all the hungry feeders. I dumped barrow load after barrow load of well-rotted horse manure on this bed back in January and let time, worms and weather do their thing. You can see in the photo above that although heavy weeds such as dock had set in, the manure had done a good job of rotting down. The quality of the soil was really obvious in this bed, compared to untreated parts of the garden, which in this dry weather are concrete-like hard-pan clay.

This photo shows clearly just how many worm holes there were in the soil. Every one of those gaps is a worm hole. It was full of worms, especially compared to other parts of the garden. And they were huge:

Big worm compared to a normal-sized worm
This all makes me very happy. I feel I won't need to dig after this year, except for planting and collecting potatoes. Mulching will do the rest for fertility for me.
After a couple of half days, I had the allotment looking less like a patch of bare dirt and more like this:
 All the digging done!
This is the allotment in its final form now. The closest three beds, in the right of the photo, are the potato patch. The next to the right are the combined carrot, onion and radish bed in the front, and vast quantities of garlic behind. The next, with the cloche frames over, will be the cooking greens (pak choi, stir fry greens etc) bed. The cloche frame is to protect the greens from the deer. Behind that will be the courgettes, melons and squashes. I hope to plant those out this coming weekend, now that it seems the frost risk has passed. The next bed on from there will be the bean beds, and soon there will be teepees running all the way down them.
Next time, I'll post more of an update on how the veg themselves are doing. But for now, I think it was a really worthwhile use of two days of leave time.
Thursday, 6 May 2010
Eating seasonally(ish): Italian herby roast potatoes and salsify with spinach and pine-nut stuffed porcini mushrooms
When I went to open up the last bag of stored potatoes last week - a mixed bag of Desiree and Robinta potatoes - they'd sprouted in the hot weather of the week before. Mea Culpa, I'd left them in a hot garden shed. I'd thought I might have to waste the 10 kg bag of spuds, but a quick sorting showed that there were some shrivelled, sprouted potatoes (which were set aside for planting because I may as well risk it), and many which were sprouted but still OK. So I knocked the sprouts off those and put them back in a paper bag in a cool place. We now have 7 kg of 'old' potatoes which will want using soon, but which will probably get us through the next couple of months until the earlies come through. I now understand why the Italians refer so often to using 'old' potatoes for gnocchi, a kilogram at a time.
This all meant that last night roast potatoes were our dinner treat, with something knocked up from whatever veg were in the fridge needing using:
Italian herby roast potatoes and salsify with spinach and pine-nut stuffed porcini mushrooms
(Serves 2 with plenty of left-over roast veg for something else)
For the roast veg:
1 kg large old potatoes, peeled and cut into roasting-size chunks
10 roots mixed parsnip, salsify and scorzonera, or whatever other root veg are in the garden
1 small handful each thyme, rosemary and sage, leaves peeled from stems but left whole
2 big glugs olive oil
salt and freshly ground black pepper to taste
optional: one head smoked garlic
Preheat the oven to 210C. Parboil the potatoes in water for 5 minutes, drain into a colander and give them a good shaking (this is the secret to crispy roast potatoes). Put in a large bowl with the other ingredients and toss to coat the veg in the oil and herbs. Pour them all into a large baking tray and bake in the oven for 45 minutes-1 hour. In the meantime, prepare the mushrooms.
For the Porcini mushrooms stuffed with spinach and pine nuts
8 baby plum tomatoes
2 large porcini mushrooms
2 chestnut mushrooms
1 tbsp olive oil
2 cloves garlic, minced
1 tbsp pine nuts
1/4 white wine
1-2 large handsful fresh spinach, chopped
10 basil leaves, torn
20 sage leaves, finely chopped
2-3 tbsp fresh breadcrumbs, made from a slice of stale bread
1-2 tsp Spanish smoked paprika
30 g (about 4-6 thin slices) tallegio cheese
Put the baby plum tomatoes in a small casserole and roast in the oven with the potaotes until soft, about 10 minutes. Remove the stems from the porcini mushrooms and chop finely with the chestnut mushrooms. Heat the olive oil in a saucepan and gently sweat the garlic and pinenuts until golden. Add the mushrooms and cook for 1-2 minutes until they release their juices, then add the wine. Reduce until the liquid is mostly gone, then add the spinach and cook until wilted. Add the herbs and breadcrumbs, and cook until the spinach blend is holding together. Set aside to cool slightly.
Remove baby plum tomatoes from oven and cut in half. Arrange several tomatoes halves inside the porcini mushrooms, saving some for the top. Sprinkle a pinch of smoked paprika over each mushroom. Press the spinach mixture into the tomatoes, top decoratively with the remaining baby plum tomato halves, another sprinkled pinch of smoked paprika and one to three slices of tallegio, depending on the size of your slices and the mushroom.
When the potatoes have been cooking for 30 minutes, remove the garlic, turn the potatoes and return to the oven with the mushrooms. Bake for 20 minutes, until the potatoes, herbs and other veg are crispy, the mushrooms are cooked and the cheese on top of them is golden. While this is happening, remove the roasted garlic from its papery skin.
Serve the mushrooms individually on a plate, and turn the roasted root veg onto a platter to serve on the side, with the yummy crispy herbs and roasted garlic cloves scattered on top to garnish. Savour the herbs as you eat the rest.
Of chickens and vegetable gardens

The chickens got an addition to their run a few weeks ago. We had planned to build them a new coop, but bought one as we came across a very solid model on sale for less than it would cost us to build. We've not yet assembled the new coop as there will be some groundwork to do, but in the meantime have used the run to extend their lock-up-daytime space. We let them free-range when we're at home, but they're clever little buggers and have been breaking into the vegetable garden every time we leave the house for something. I've not planted much in that one yet, but I have to admit that when I got home on Monday and found that one had broken in yet again and scratched up several of my lettuces, I had a humour failure. I had to remind myself that they produce beautiful eggs.

Because they're Araucanas, we get blue eggs. We can tell which is from who: Black produces large, ovel, pale pastel blue eggs; while Lavender produces smaller, bluer eggs with a pointy end. Lavender is obviously a more pure-bred Araucana than Black.

To store my eggs, I treated myself a an egg skelter. I can't say enough good things about this, it's brilliant. It's made by a husband-and-wife engineering firm in Devon, and stores up to 24 eggs in a way that ensures you always eat your eggs in the order they were laid. We're getting about 10 eggs each week from the two girls at the moment. That will go up next summer when the Lavender baby (known as Little Dave, for in-joke reasons) comes on-line. I hope to get another young chick later in the summer for the year after. We don't necesarily manage to eat them all, but it's a real treat to be able to give eggs away. We're not needing to keep eggs for more than a week at the moment, and often eat eggs that have been laid the same day. I'm planning to store some in a fruit cake soon (that will use up 6), we often make a Spanish potato tortilla (which uses 6), but even so I must look into waterglass to be able to store some for the leaner winter months.
 The project to bird-net the veggie garden is ongoing, amongst all the other projects we're doing at the moment. Nothing happened on it this past weekend, amongst bean patch digging, potato planting and kitchen-ripping-out. The cheeky buzzards are proving experts at finding their way in, no matter what we do, so we've decided that a knee-high baffle all the way around the garden is the way to go!
But this coming weekend we're planning a weekend off amongst all the busyness, to enjoy a weekend of motorcycling, steam trains and ale festivals!
Tuesday, 4 May 2010
Eating seasonally: Green spring vegetable pasta for non-asparagus lovers
Green spring vegetable pasta
(for 2-4, depending on how hungry you are. Takes about 20 minutes to cook.)
200g tagliatelle (we find three tagliatelle nests are enough for four people)
2 glugs olive oil
1 small onion
1 stick celery
1 green chilli
6-8 spears asparagus
2 small or 1 large leek, or a mix of leek and green garlic tops
1 vegetable stock cube, 1/2 cup white wine and 1/2 cup water, or 1 cup home-made veggie stock
2 cloves garlic, minced
juice and fine zest of 1 lemon
1 handful basil leaves, finely chopped
shavings of parmesan - to taste, but about 1 cup
Chop the onion, celery, chilli and leek together. Bend the asparagus to break off the woody base, remove and reserve the tips and chop the stems.
Bring a large pan of water to the boil. While it's coming to the boil, heat 1 glug of olive oil in a large saute pan and saute the vegetables for a few minutes. Add the stock, bring to the boil, and simmer for a few minutes more. Remove from heat and whizz in a blender to a puree.
Put the pasta on to cook according to packet directions, adding the asparagus tips four minutes before it's al dente. Heat the other glug of olive oil in the saute pan, add the garlic and sweat until soft. Add the pureed vegetables, basil, juice and zest of the lemon and simmer while the pasta cooks. Drain the pasta and toss through the sauce, adding a little of the pasta water if neccesary. Remove from the heat, toss some parmesan shavings through and serve in a large bowl with extra parmesan shavings on top.
Subscribe to:
Posts (Atom)